We get to interact on a regular basis with an international, multicultural audience, even here in the US. One common theme that we almost constantly notice is that customers want to be able to cater to their own community in a manner that shows respect to their culture, using their culture's native language. Even though everyone and their neighbor are pretty fluent in English these days, culture remains something one cannot, and should not, ignore. It's their DNA. As a multicultural company ourselves, we know that all too well.
Currently, Azure Marketplace publishers who want to expand their global reach, and demonstrate respect to cultures where they have a relatively large user base, can create offers in multiple languages by making a copy of their "default" offer. The default offer is usually in English (since that gives you the broadest reach in an Azure Marketplace that is currently English-centric). That means that if they want to support 3 languages, say English, French and Spanish, they have to create and maintain 3 versions of the same offer that only differ in the language of the marketing information (offer and plan names and descriptions) and the UI of the offer, embedded in the offer's technical artifacts of each plan. That can turn into a real nightmare to maintain.
Our Approach
When we were building Maestro Studio Ensemble, we took note of the needs and concerns we heard, and we took it to heart as we endeavored to address it and fix as much of it as we could. As a result, we built into Maestro Studio Ensemble a UI extension we called the Language Extension. Let's take a look.
At the heart of it, the Language Extension is a feature that allows publishers to apply internationalization (i18n) and localization (L10n) to their offer's UI definition without manually editing any of the UI components or writing any JSON. We wanted to make it such that with only a few clicks you can turn your existing Azure Application (Managed Application or Solution Template) offer's technical artifacts (specifically the createUiDefinition, since that's where the User Interface is defined) into an internationalized and localized offer.
 Moka's take:
The interesting thing about cultures and languages is that there are so many of them. But even if we pick one of them, English for instance (since in our cognitive bias, we typically over-generalize by assuming that since everyone knows English, then it is OK to "normalize" to English), we tend (specifically in the US) to standardize on en-US -- that's English to us.
Well, it turns out that en-US is not the only English. There is en-GB, used by a pretty large population across the UK and the British Commonwealth (the Commonwealth of Nations). There are so many locale variants for English. It is not fair to that audience to be folded under en-US, is it?
The following video demonstrates an example of an existing Azure Marketplace offer, one of Informatica's Solution Templates, imported into Maestro Studio Ensemble. In only 2 minutes and 52 seconds, we import the offer's technical artifacts into Maestro Studio Ensemble's visual designer, apply internationalization and then localization in 3 languages: English, French and Arabic. Take a look at the video and then read on for more details about the Language Extension feature and how you can use it today (spoiler alert: you can simply get the Free Edition of Maestro Studio Ensemble from the Azure Marketplace or from our website to try it out for free).
How Does This Work?
Now that you've watched the short video, we can dive a bit more into the details, including some of the prerequisites, and the current limitations of this feature. Let's dive right in.
Prerequisites
There are not many prerequisites:
- Install Maestro Studio Ensemble. The Free Edition has the Language Extension feature available and enabled. As mentioned earlier, you can get it from the Azure Marketplace or from our website.
- To apply localization in your desired languages, you need to have an API key for Azure AI Translator. You don't need to use a paid tier. The free tier will be more than sufficient for use in Maestro Studio Ensemble. You can use this Azure documentation document to create a new Translator resource.
Maestro Studio Settings
Get the Azure Translator API Key
You can use the document mentioned above to learn how to get the API key. The following screenshot shows the Keys and Endpoint section of the Translator blade in the Azure Portal.
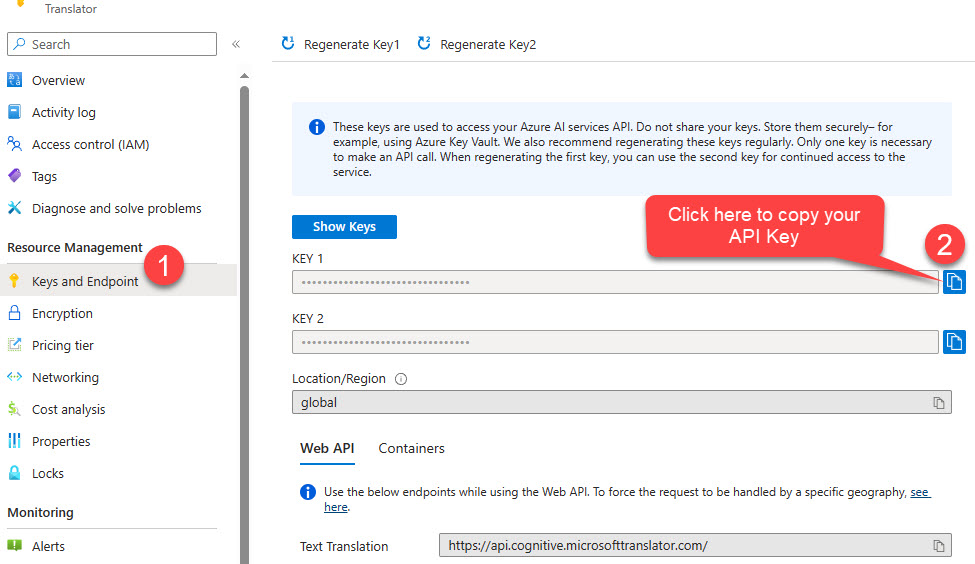
Figure 1. The Azure Translator blade in the Azure Portal.
Store the API Key in Maestro Studio Ensemble's Settings
With the Translator account created and the key retrieved, you need to add the API key to Maestro Studio Ensemble's settings, as shown in this screenshot:
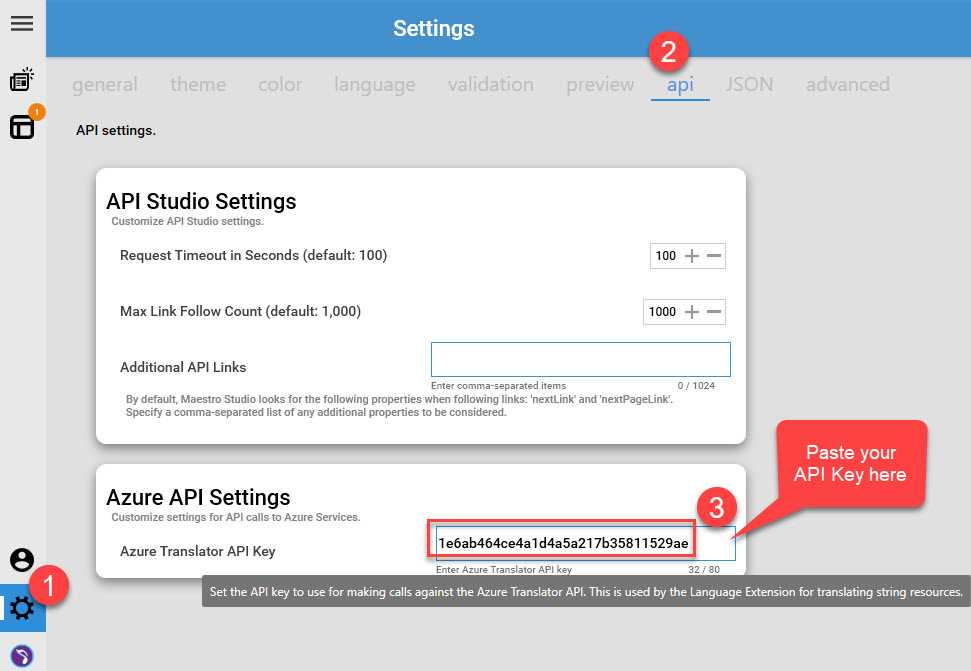
Figure 2. Setting the Azure Translator API key in Maestro Studio Ensemble's Settings api tab.
Enable UI Extensions
UI Extensions are a new feature. It is not enabled by default to minimize confusion to Maestro Studio Ensemble's users. In the future, it will be enabled by default, but for now, you just need to toggle ON the Enable UI Extensions toggle button, as shown in the following screenshot:
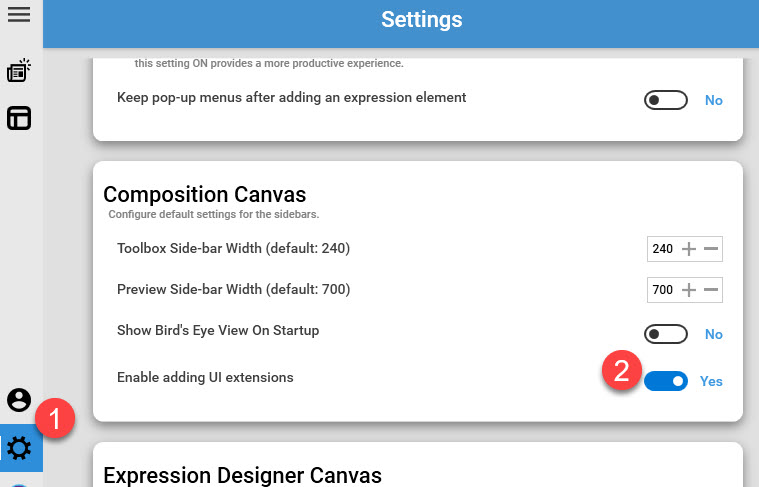
Figure 3. Enabling adding UI extensions from Maestro Studio Ensemble's Settings general tab.
Importing an Azure Application into the Visual Designer
Importing your existing Azure Application that is already published on the Azure Marketplace couldn't be easier. You can import your .zip package file that you've used when publishing your offer (the one you uploaded into your Plan's Technical Configuration section in Partner Center).
To make it easier for you, we provide an Azure Marketplace picker dialog that you can use to filter and select your particular offer and plan and click a button to get it automatically imported and visually rendered in Maestro Studio Ensemble's visual designer.
The following screenshot shows an example (as does the video above):

Figure 4. Using the Azure Application picker to find your published offer and import it into Maestro Studio Ensemble's visual designer.
Internationalization (i18n) and Localization (L10n)
The Language Extension helps a publisher apply both internationalization (or internationalisation, if you so prefer) and localization (or localisation) without the need to do anything other than select the desired language locales to localize against. Here's how you can do it.
First, add the Language Extension to the visual designer canvas:
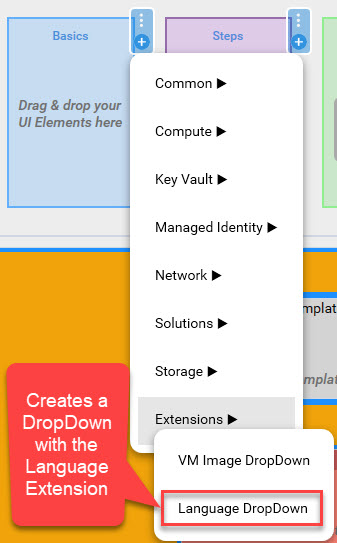
Figure 5. Adding the Language Extension to the visual designer.
Then, apply i18n and L10n by clicking on the Initialize Language Resource Names and Edit Language Resource Names respectively from the popup menu, as shown in the following screenshot:
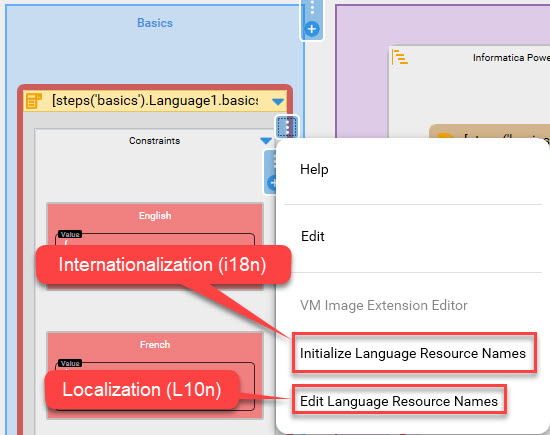
Figure 6. Applying internationalization and localization to the Azure Application in the visual designer.
The process above takes seconds. Once you're done, you can preview your offer. Maestro Studio Ensemble's preview feature allows you to see how the offer's UI will look in the Azure Marketplace as well as be able to test it end-to-end, i.e. including deploying the ARM Template. It's as if you've published the offer to the Azure Marketplace's preview (aka staging), except that inside Maestro Studio Ensemble it takes only seconds, not hours waiting for the Azure Marketplace process to finish.
Managing Updates
What happens when the Managed Application needs to be updated? For example, a common scenario is one where new UI widgets are added or updated.
In this case, all that needs to happen is to simply repeat the internationalization and locations steps shown above:
- Applying internationalization again detects new or changed UI controls and replaces static strings with dynamic expressions.
- Then, applying localization will add translations for any new or updated resource strings. If existing translations need to be updated, toggling ON the override toggle button, shown in the screenshot below, does the trick.
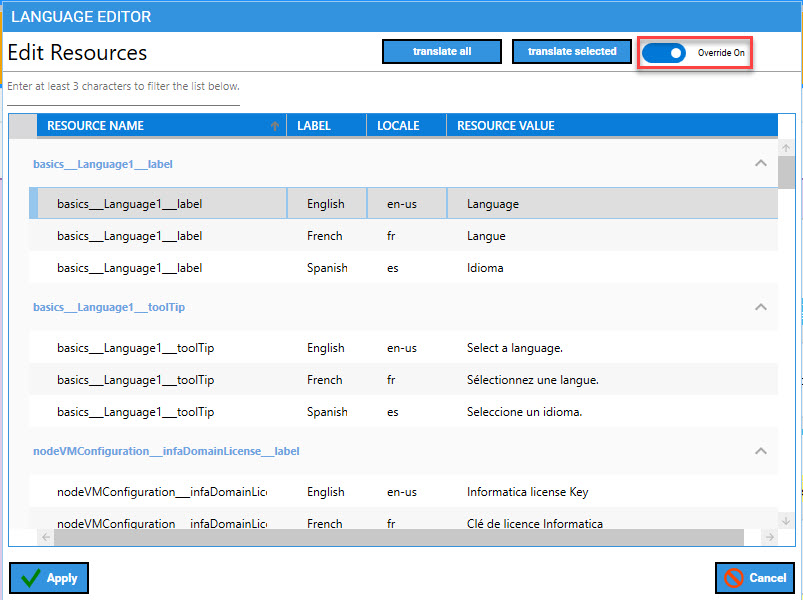
Figure 7. The Resource Editor where resource string translations are managed.
Limitations
The current limitations are pretty much the limitations that createUiDefinition has today. The Language Extension relies on dynamic expressions to setup the UI components and make them internationalization-ready. Any controls or fields that do not support UI expressions will not benefit from this feature, as shown in this list of currently known limitations:
- Steps in createUiDefinition do not support dynamic expressions. A Step's Label field can only have a constant/static string. One workaround for this limitation for scenarios where only 2 languages are used is to set the Step's Label to the string in both languages.
- Sections only support the evaluation of dynamic expressions in their Label field the first time they are rendered; this is identical to how the DefaultValue field in createUiDefinition is evaluated. A similar workaround to the one stated in bullet point #1 can be leveraged here as well. If you use a lot of sections, this workaround can start to make things look messier, so evaluate utilizing this approach on a case-by-case basis and see if it makes sense for you.
- The VirtualNetworkCombo UI control does not support UI expressions on its Label and ToolTip fields. Since this control is typically used once in a createUiDefinition, it is probably better to leave it as is than try to localize it. As with the previous advice, you be the judge on what's best for your scenario.
 Tip:
Tip:
While The Azure Translator seems to do an awesome job based on our use of the service, there are always edge cases that can be missed. No service is perfect, but they all do keep improving all the time.
When translating to a language or culture that you or your employees have no familiarity with, it is best to consult a professional translation service and have them review the automated translations you've generated.
Call to Action
All the features demonstrated in this article are available in the Free Edition of Maestro Studio Ensemble which allows you to kick the tires, so to speak, and get a first-hand experience of the product and the value it can bring and benefits it can add to your publishing process so you don't have to deal with the mundane details and focus on your own product.
Building multilingual application user interfaces helps broaden the reach of your products to a global audience. Using Maestro Studio Ensemble helps unblock that global reach by democratizing the process of building multilingual Azure Applications for the Azure Marketplace.
We hope you find this feature useful. Please provide us with feedback using our Contact form. If you happen to install the Free Edition, you can send us feedback from within the product using our Megaphone feature.